How To Embed Your Sales Process In Salesforce
How to bring structure to your sales methodology in Salesforce and make it work.
Last updated June 3, 2026


Download the 12 Must-Have Charts for Your Salesforce Dashboard eBook today!
How To Embed Your Sales Process in Salesforce
Building your sales process in Salesforce is critical because it’s not just what you sell that wins deals, but how you sell it.
The most successful sales teams operate within a clearly defined framework, applying best practice principles tailored to their products, services, and target customers.
That’s not to say there isn’t room for individual flair, creativity, and flexibility – top performers will always stand out. But as a team, success comes from consistently working within a structured process.
How To Build A Sales Process in Salesforce
Why Embed Your Sales Process In Salesforce?
When you embed your sales process in Salesforce:
- Sales teams consistently apply the correct opportunity stages to deals, thereby improving sales performance reporting and pipeline visibility.
- Qualification improves because appropriate information sales teams gather and validate information before investing time/resources chasing opportunities you are unlikely to win.
- Onboarding new salespeople is fast because they can operate in a structured framework.
- There’s rigor throughout the sales process in gathering and communicating information.
- Win rates improve through better engagement with stakeholders involved in B2B buying decisions.
- Data-driven coaching leads to continuous improvement because you have a consistent framework for identifying where deals stall, enabling targeted coaching.
How To Build A Sales Process in Salesforce?
In this article, we share 5 steps on how to embed your sales methodology into Salesforce:
Step 1: Define your opportunity stages and set exit criteria.
Step 2: Create the fields your sales process needs.
Step 3: Add custom features and automation to control your sales process.
Step 4: Embed hints, tips, and materials that help salespeople.
Step 5: Build reports and dashboard charts for managing sales performance.
Step 1: Define your opportunity stages and set exit criteria
Adjust Opportunity Stages
Many companies struggle to set up their sales process in Salesforce because the standard opportunity stages don’t align with their methodology or naming conventions.

Start by defining the opportunity stages in Salesforce so they reflect your individual sales process. For example:
- Prospecting
- Discovery
- Customer Evaluating
- Closing
- Closed won
- Closed lost
The opportunity stages must be clear, unambiguous, and reflect sales activity over time.
Set Exit Criteria
Next, define your stage exit criteria – what must be achieved before a deal from one stage to the next.
For example, to progress from Prospecting to Discovery, you might require:
- Customer commits to a requirements workshop
- Commitment from a C-Suite executive to attend the workshop
- Three members of the customer buying stakeholders were identified
Well-defined exit criteria bring clarity and consistency to your sales process. Each opportunity stage reflects real progress, not guesswork.
The result? More reliable pipeline reporting, improved pipeline coverage analysis, and greater forecast accuracy.
Got a Salesforce Challenge you'd like advice on?
Book a free 45-minute consultation with one of our Salesforce experts. You choose the topic - we'll give you practical, honest recommendations on how to improve.
Free Salesforce Review | 45 Minute Web Meeting | You Choose The Topic
Step 2: Create Fields That Support Your Sales Process
Every effective sales process in Salesforce requires salespeople to capture key information as a deal progresses.
To support this, you can structure your data in two main ways:
- Build the fields directly on the opportunity – Ideal for core information that should be visible and consistently captured across all deals.
- Create the fields in a custom object that links to the opportunity – Best suited for more complex or repeatable data, such as multiple stakeholders, decision criteria, or detailed qualification frameworks.
Choosing the right approach ensures your sales team captures the right information at the right time—without cluttering the opportunity or overcomplicating the user experience.
Option 1: Build Sales Process Fields on the Opportunity
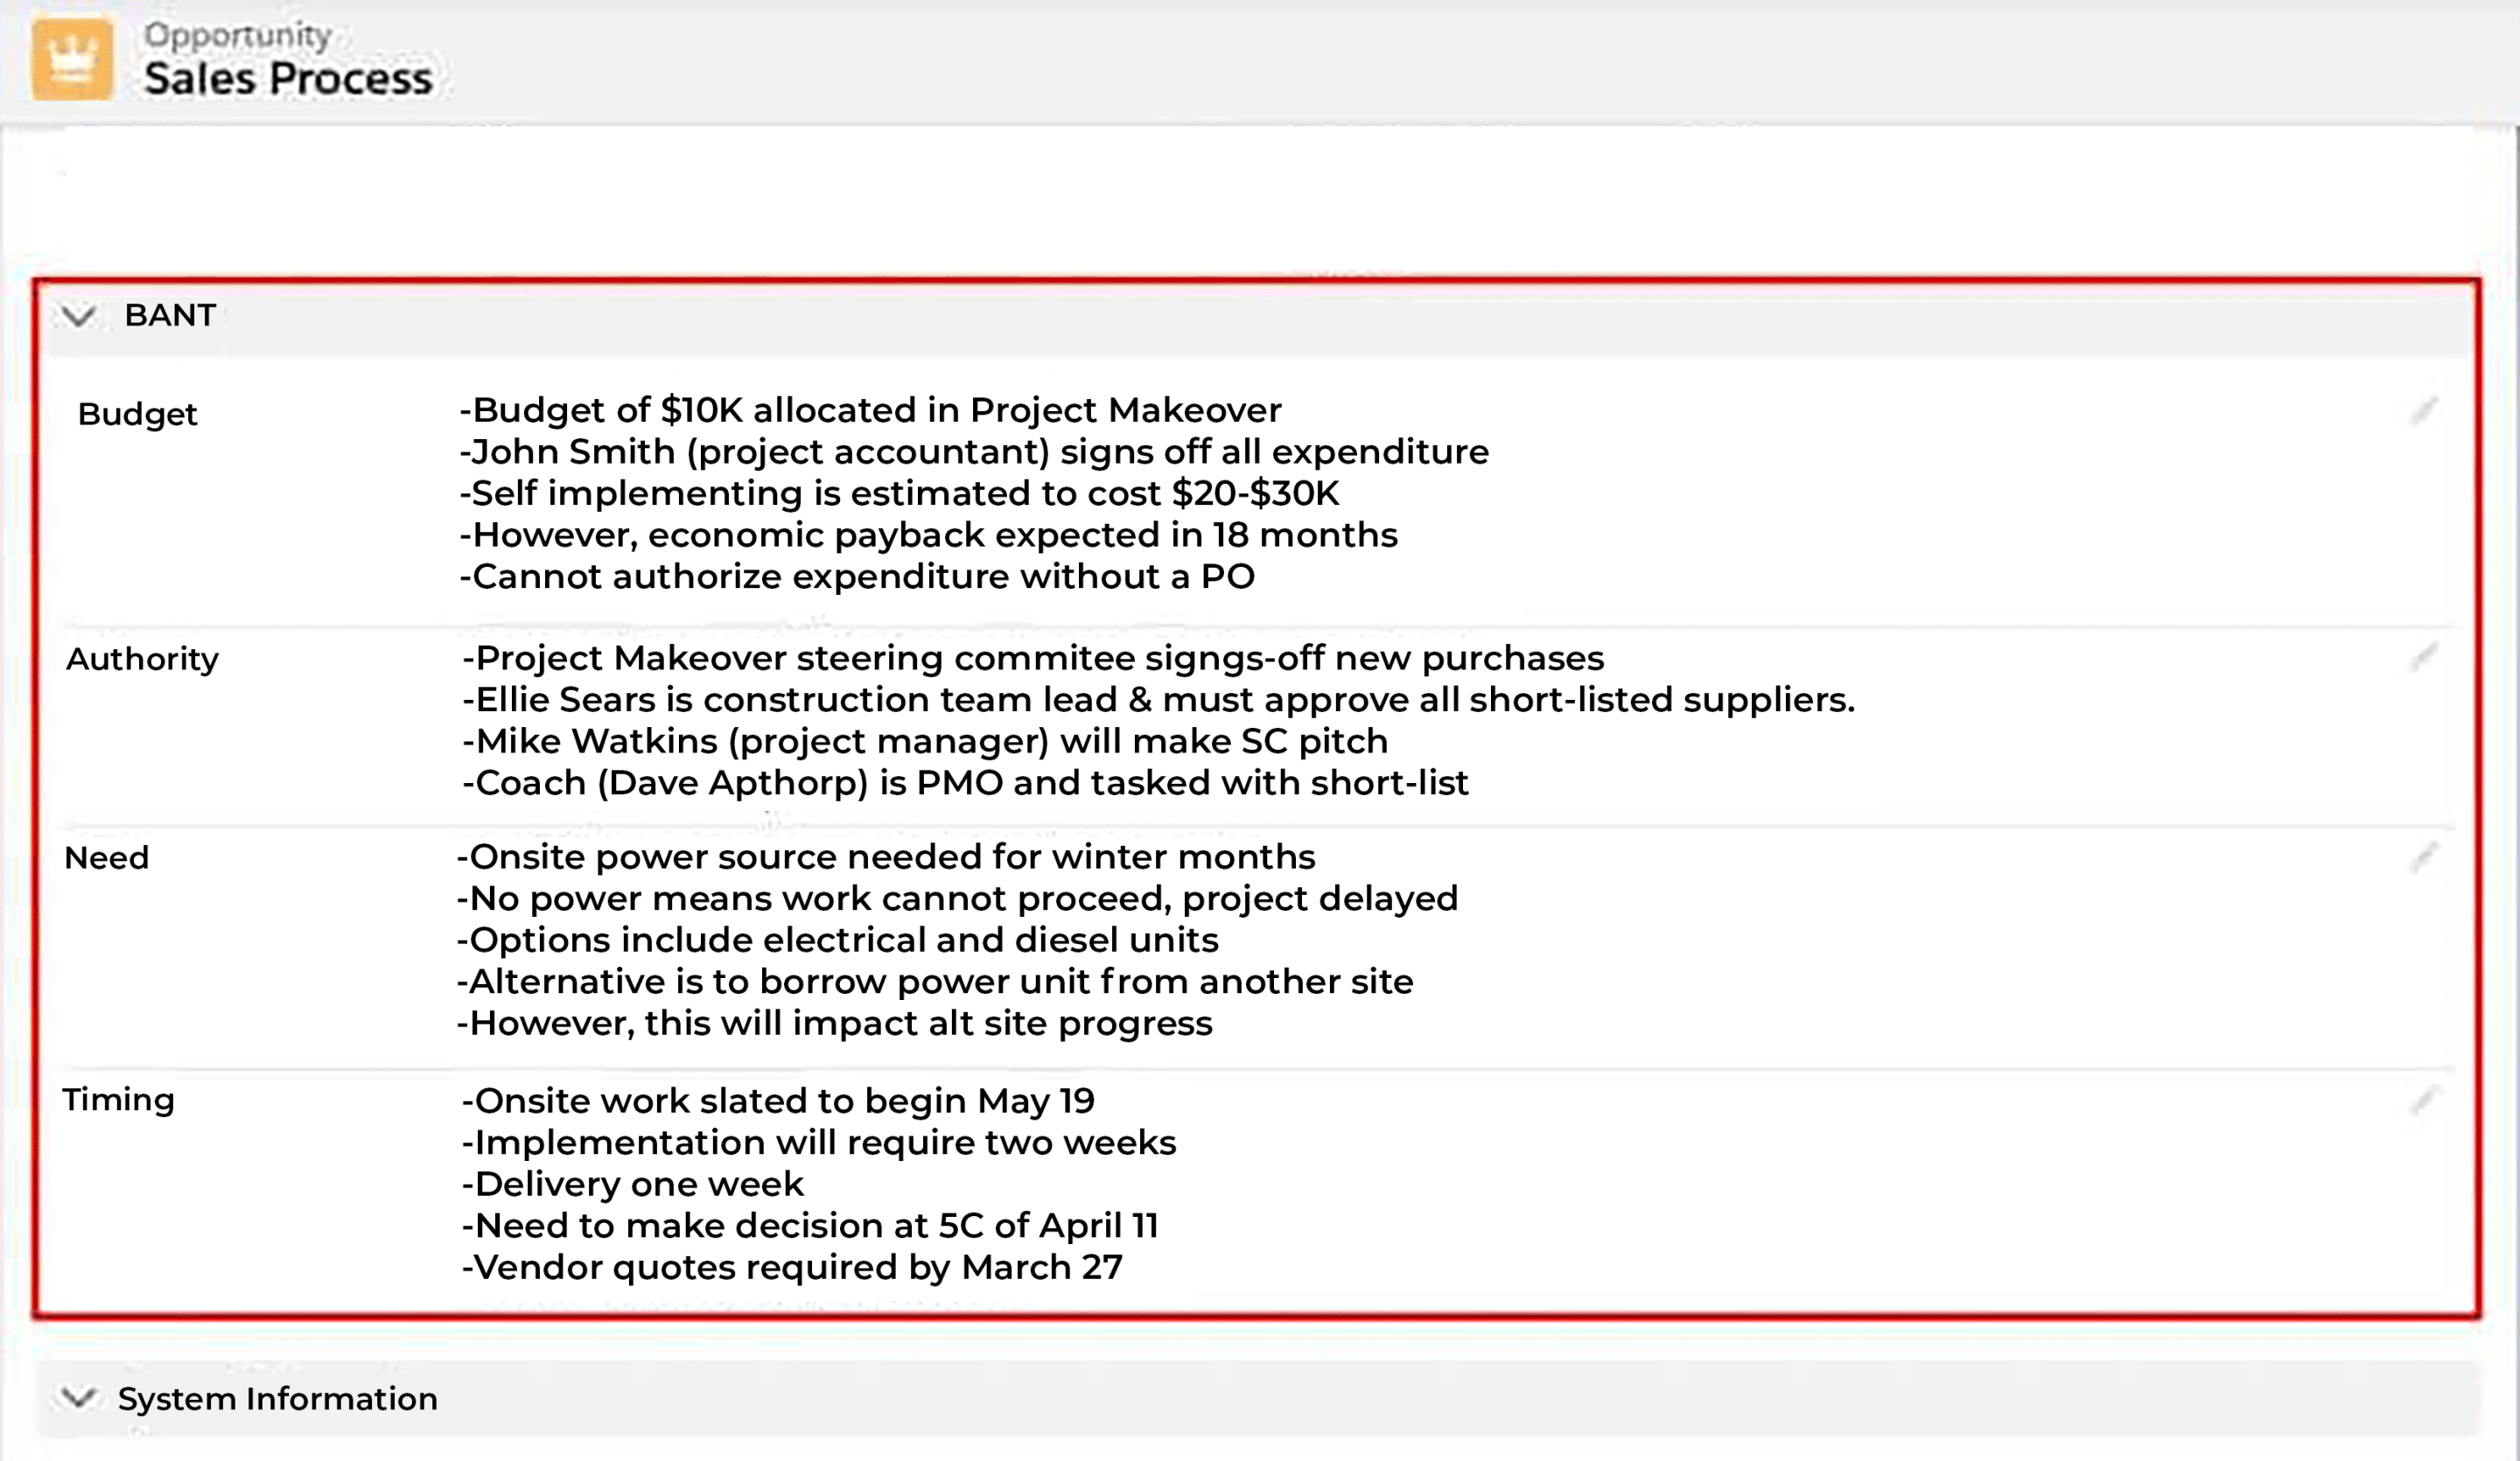
Let’s use the BANT sales methodology as an example, which, if you’re unfamiliar, stands for:
- Budget
- Authority
- Need
- Timescale
The salesperson must gather information about each of these topics throughout the sales cycle. In this example, you can see that the information used in the sales methodology is directly visible on the opportunity. This means it’s straightforward for salespeople to enter and can be quickly read by sales leaders or other employees.
Option 2: Build Sales Process Fields in a Custom Object
Now, let’s use the SCOTSMAN sales methodology, which, if you’re unfamiliar, stands for:
- Solution
- Competition
- Originality
- Timescale
- Size
- Money
- Authority
- Need
There are two essential differences in the way SCOTSMAN and BANT are typically implemented.
- There is LOTS more information collected during the sales cycle with SCOTSMAN. Each of the eight topics above has several supporting questions.
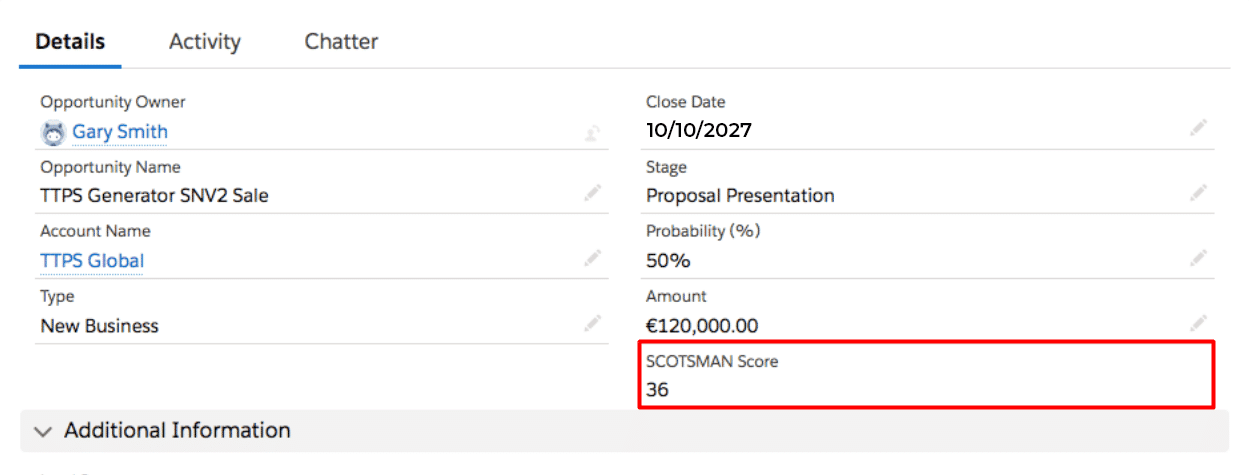
- SCOTSMAN also uses a scoring system on each item to give an overall opportunity value. This score evolves as the deal passes through the sales cycle and you add more information.
The best way to implement the SCOTSMAN sales process in Salesforce is to record the information in a custom object that links to the opportunity:

You can also use the score as a stage exit criteria. For example, the score must be 22 to move from Discovery to Customer Evaluating and 28 to move from Customer Evaluating to Closing.
Of course, there are several other sales methodologies. For example:

It doesn’t matter which sales methodology you use. The critical point is to create the fields in Salesforce either on the opportunity or a supporting custom object.
Step 3: Add Custom Features and Automation to Control Your Sales Process
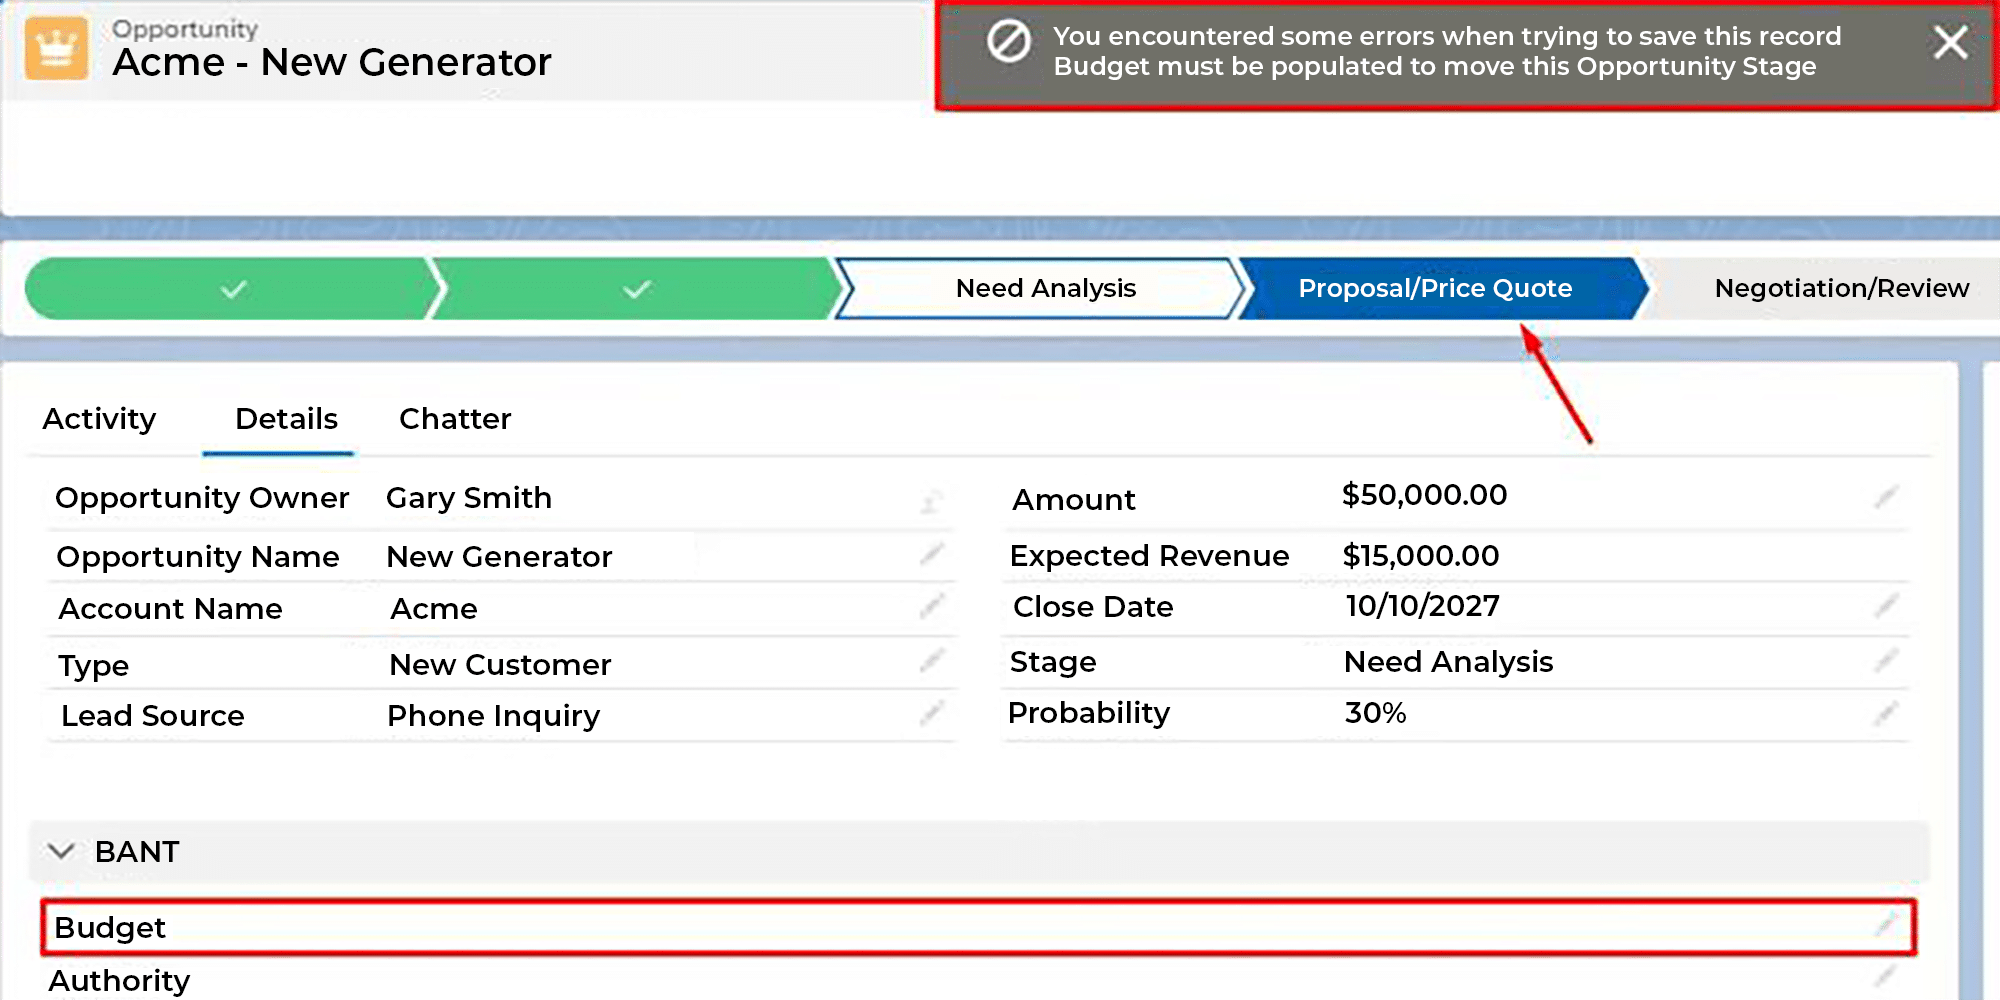
When you build your sales process in Salesforce, you can enforce adoption through several measures – the most widely used being validation rules.
For example, this validation rule means that salespeople must have entered information into the Budget field to move it past the Needs Analysis Stage.

Validation rules play an important role in your Salesforce sales process setup because they ensure critical data is gathered at each stage.
But don’t overdo it – too many validation rules merely frustrate users and reduce adoption. Instead, think about the value-adding features you can use in Salesforce to enhance the sales methodology.
Step 4: Embed Hints, Tips, and Useful Materials
While your sales team has likely received training on your sales process, Salesforce allows you to take further steps to encourage adoption and make it easier for the sales team to apply it. For example:
- Lightning Path.
- Embedding your Sales Playbook (if you have one).
- Field Hover tips.
- Salesforce Page Tabs.
Lightning Path
The Salesforce Lightning Path is a set of chevrons at the top of a Salesforce page.
Salespeople can expand each chevron to view supporting notes, tips, and fields. For example, here are the exit criteria for the Customer Evaluating stage on an opportunity.

You can also embed relevant sections of your sales playbook into custom tabs on the opportunity page layout.

Field Hover Tips
Field Hover Tips provide guidance for specific fields, appearing when the salesperson hovers over the hover icon next to the field. Here’s an example, using the Budget field.

To create Hover Tips:
- Go to the field in Setup.
- Click Edit next to the field.
- Enter your hover tip in the Help Text section.
- Click Save
Step 5: Create Sales Reports and Dashboards
To track team performance and pipeline coverage effectively, begin by implementing the right reporting framework.
A great starting point is the GSP Sales Dashboard, a free app that includes all the reports and dashboard charts recommended in the “12 Must-Have Sales Dashboard Charts”.
From there, tailor dashboards by roles, so each user sees the metrics most relevant to them. This improves adoption, drives more actionable insights, and keeps everyone aligned on performance and pipeline health.
You’ll also need to track sales and pipeline against quota. Since Salesforce doesn’t provide a standard Target tab a practical solution is to use the GSP Target Tracker app. This enables clear reporting against budget at the rep, team, region, and company levels.
Discover More About GSP Target Tracker
GSP Target Tracker is a powerful way to measure sales performance against quota – without adding extra work for your sales team.
Fully automated and easy to use, it delivers clear, visual insights that help you:
- Compare won revenue and pipeline coverage against sales targets.
- Monthly, quarterly, and annual quotas for teams and reps.
- Highly visual target metrics with zero extra effort for salespeople.
Discover more and take a free trial from the AppExchange. Or if you have questions, it’s easy to get in touch.
Build Your Sales Process in Salesforce: FAQs
Use validation rules – they’re the simplest way to ensure your sales teams have captured all the information needed for an opportunity to move to the next stage in your sales process.
Is Your Salesforce Working as Hard as You Are?
Book a free 45-minute review. Bring your biggest challenge — we'll give you straight-talking, actionable advice, no strings attached.
Free Salesforce Review | 45 Minute Web Meeting | You Set the Agenda