Volume Pricing in Salesforce Made Simple
Discover how GSP Volume Pricing makes it easy to manage band-based and tier-based pricing in Salesforce.
Last updated March 13, 2026


Download the 12 Must-Have Charts for Your Salesforce Dashboard eBook today!
"How To Do Volume Pricing in Salesforce?"
It’s a question many people ask, because there’s no out-of-the-box Salesforce support for quantity-based pricing, which puts many businesses in a difficult position. And while traditional CPQ (configure, price, quote) tools can help you manage volume pricing in Salesforce, this software is often costly, complex, and excessive for many organizations.
Our answer: GSP Volume Pricing – an app that offers a faster, simpler alternative to CPQ, and which supports both band- and tier-based pricing in Salesforce. Simple to use and offering quick deployment, the app is designed to enable smarter selling, so your sales teams can apply volume discounts accurately and efficiently.
Struggling to Set Up Volume Pricing in Salesforce?
If you're struggling to set up volume pricing in Salesforce, you're not alone. Salesforce lacks a standard feature to support volume pricing on opportunities and quotes, leaving many businesses at a disadvantage.
What is Volume Pricing
Volume pricing (aka 'volume or quantity-based discounting') is a strategy where the price per unit decreases as the quantity purchased increases.
For example, if you buy 5 units at full price, the total cost is $5,000. But if you increase the number of units purchased to 15, the price per unit drops from $1,000 to $900 each, so you only pay $13,500.
By offering discounts on larger orders, you encourage customers to purchase in larger quantities, which increases your revenue while reducing their costs.
To set up volume pricing in Salesforce, one option is to implement a CPQ system. However, the complexities, price tag, and time required to set up these systems deter many people. Not to mention it comes with sophisticated capabilities that your organization may not need.
An alternative option is the GSP Volume Pricing app, which offers a straightforward and fast way to implement band- and tier-based pricing in Salesforce, at a fraction of the cost. Just take a look at how GSP Volume Pricing can help your sales reps to sell smarter:
Volume Pricing in Salesforce: Should You Use Bands or Tiers?
Whether your organization uses band-based pricing in Salesforce or tier-based pricing in Salesforce, GSP Volume Pricing supports both. In the following 2 sections, we look at how to do volume pricing in Salesforce using the app through both methods:
Band-Based Volume Pricing
With band-based pricing in Salesforce, your customers pay the same price for all units, with the band determining the price.
For example, let's say you have a product with a list price of $1,000. Your volume discount table might look like this:
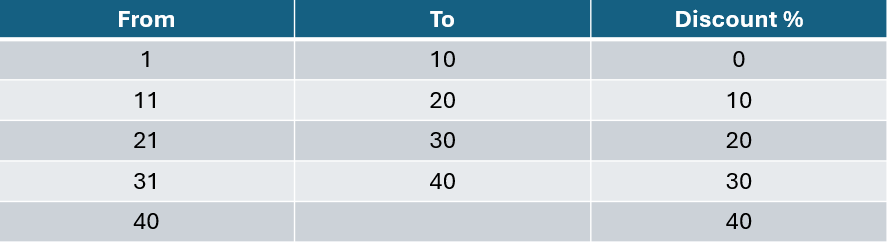
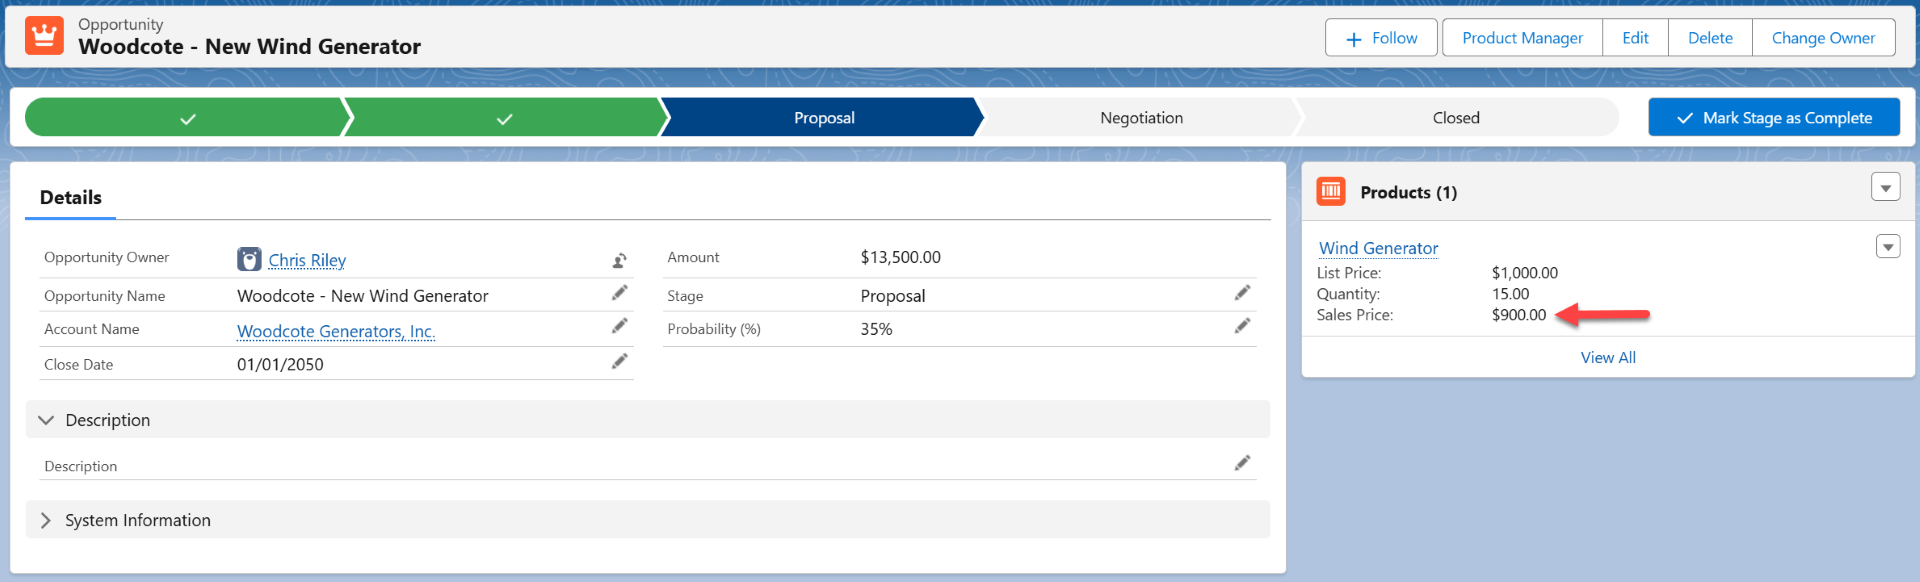
Here's how this pricing table works in Salesforce using GSP Volume Pricing:
If the salesperson enters a quantity of 15, the unit price drops to $900 ($1,000 less 10% discount), and the total cost is $13,500.
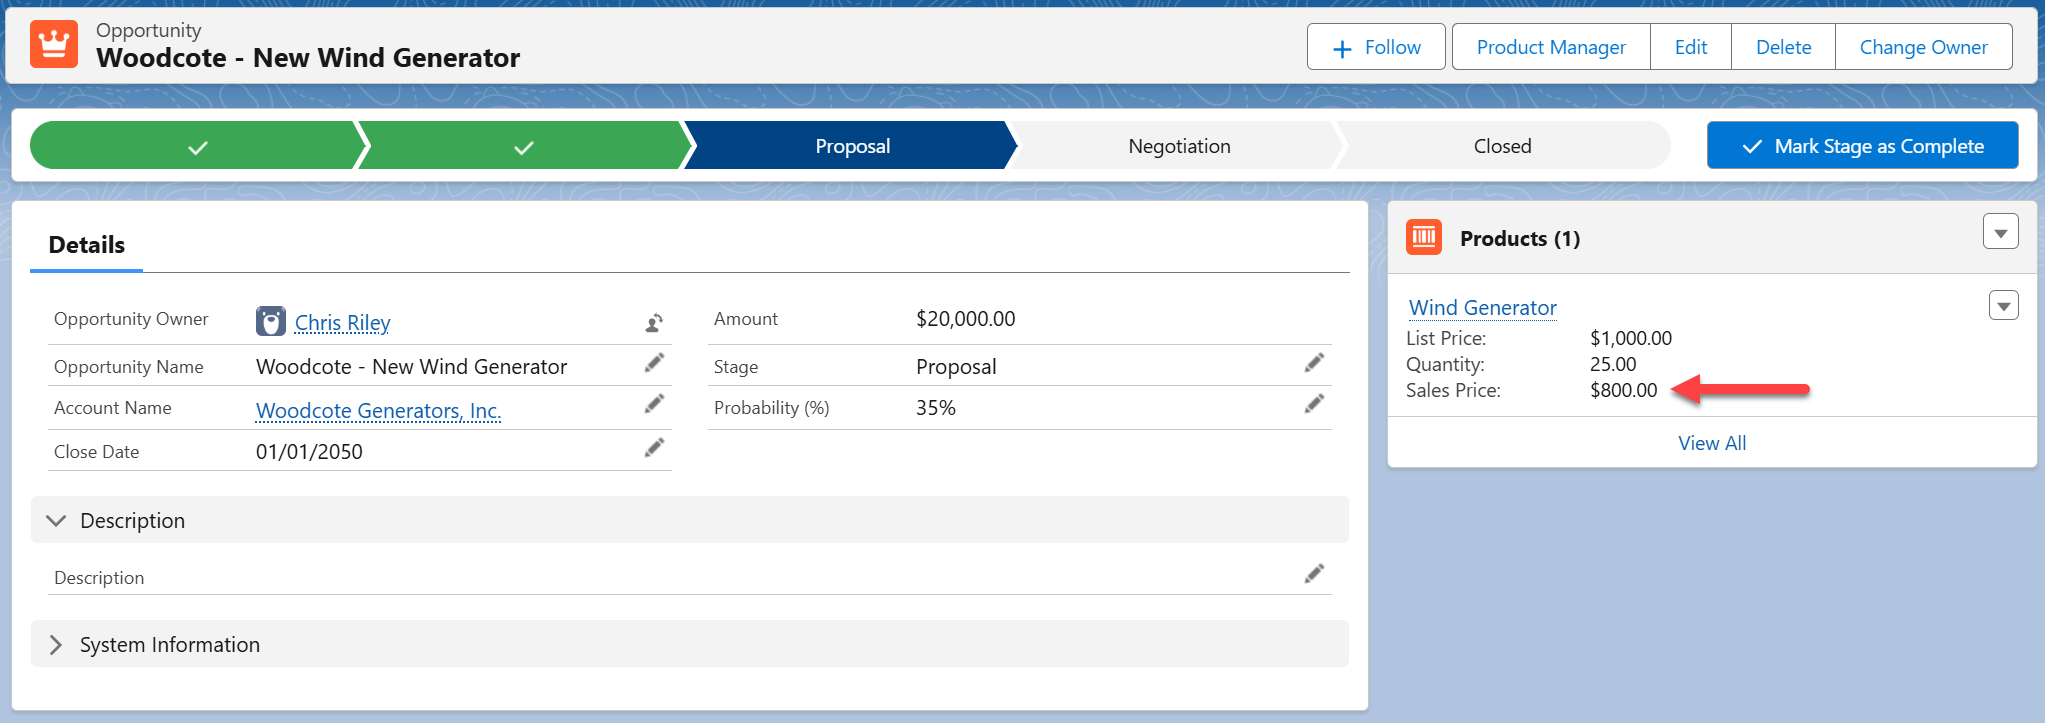
Alternatively, if the quantity is 25, the unit price is $800.
Tier-based Pricing in Salesforce
With tier-based pricing in Salesforce, customers pay different prices for each tier. For example, using the same table, the customer gets no discount for the first ten units, a 10% discount for the units between 11 and 20, and a 20% discount for the units between 21 and 30.
Here's how that looks in Salesforce, based on a quantity of 25. The app determines the appropriate price by combining different prices for each tier. In this example, that's $920 per item.
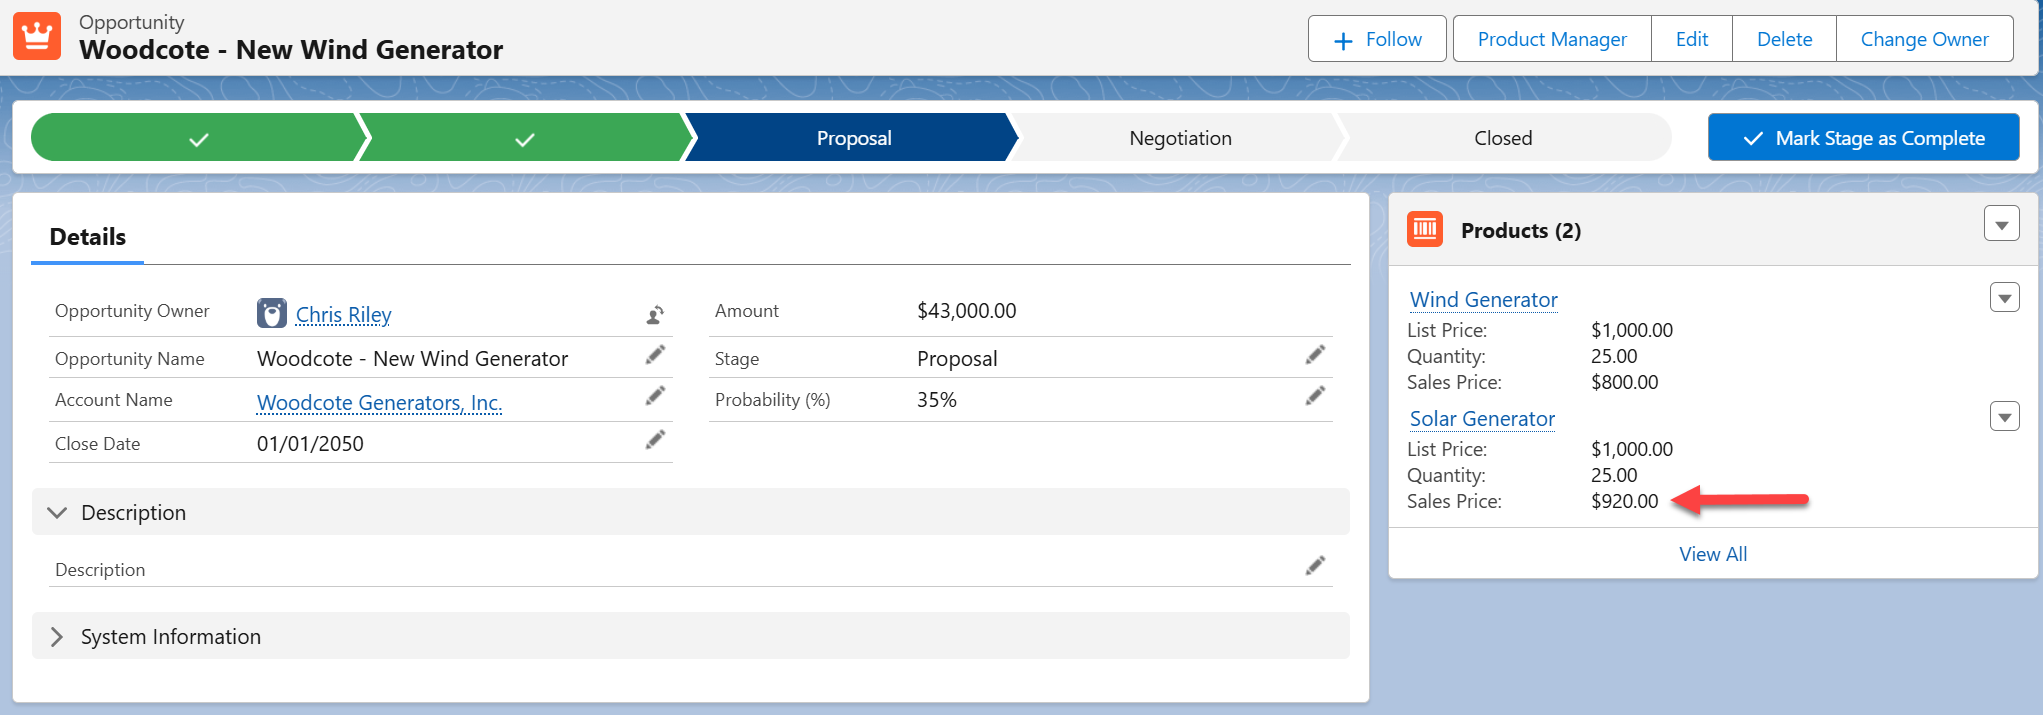
As you can see, for two matching sets of discount thresholds, tier-based pricing will always generate a higher per-unit figure than band pricing.
You can also use tier-based pricing in Salesforce to manage incremental pricing. In other words, the price will slightly differ for each additional unit increase of one.
How To Do Volume Pricing in Salesforce
Now that we've seen the app from a salesperson's perspective, let's examine how to set up GSP Volume Pricing in Salesforce. Simply follow along with the step-by-step instructions below, or watch the video here.
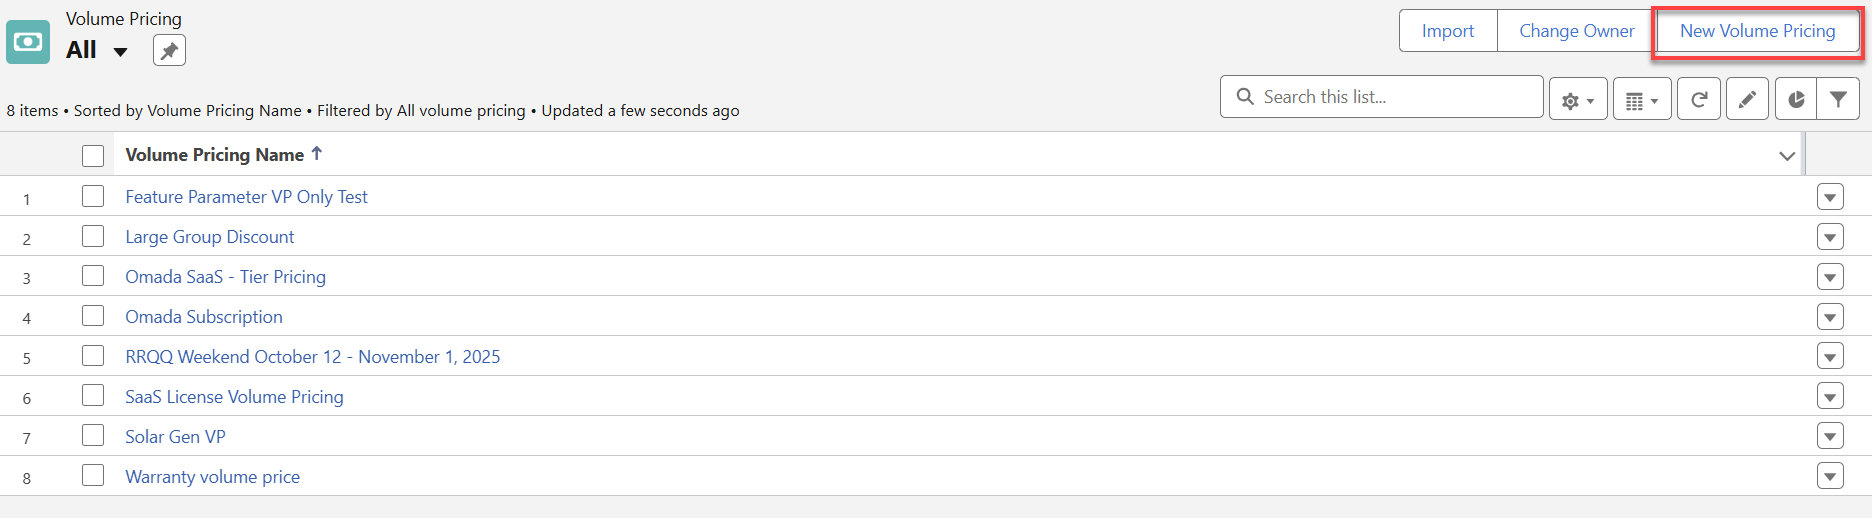
Once you have installed GSP Volume Pricing and finished the setup for the page layouts, click the New Volume Pricing button in the top right corner of the Volume Pricing tab.
We can select a Volume Discount Method of Bands or Tiers on this next screen.
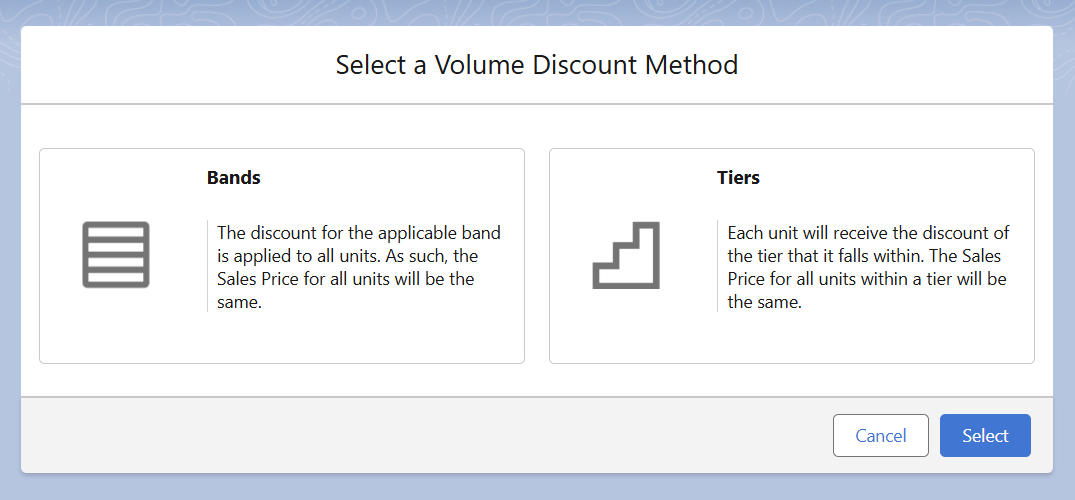
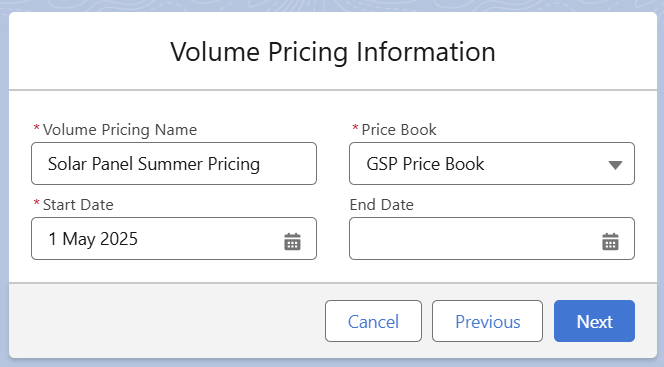
For this example, let's use Bands. Clicking Bands allows you to enter essential details, including the Volume Pricing Name, Price Book, Start Date, and, optionally, the End Date.
Pro-tip. You can set a future Start Date, allowing you to schedule volume discounts that apply in advance. The End Date allows you to specify the exact period for which the quantity-based price applies; leave it blank if the discount applies indefinitely.
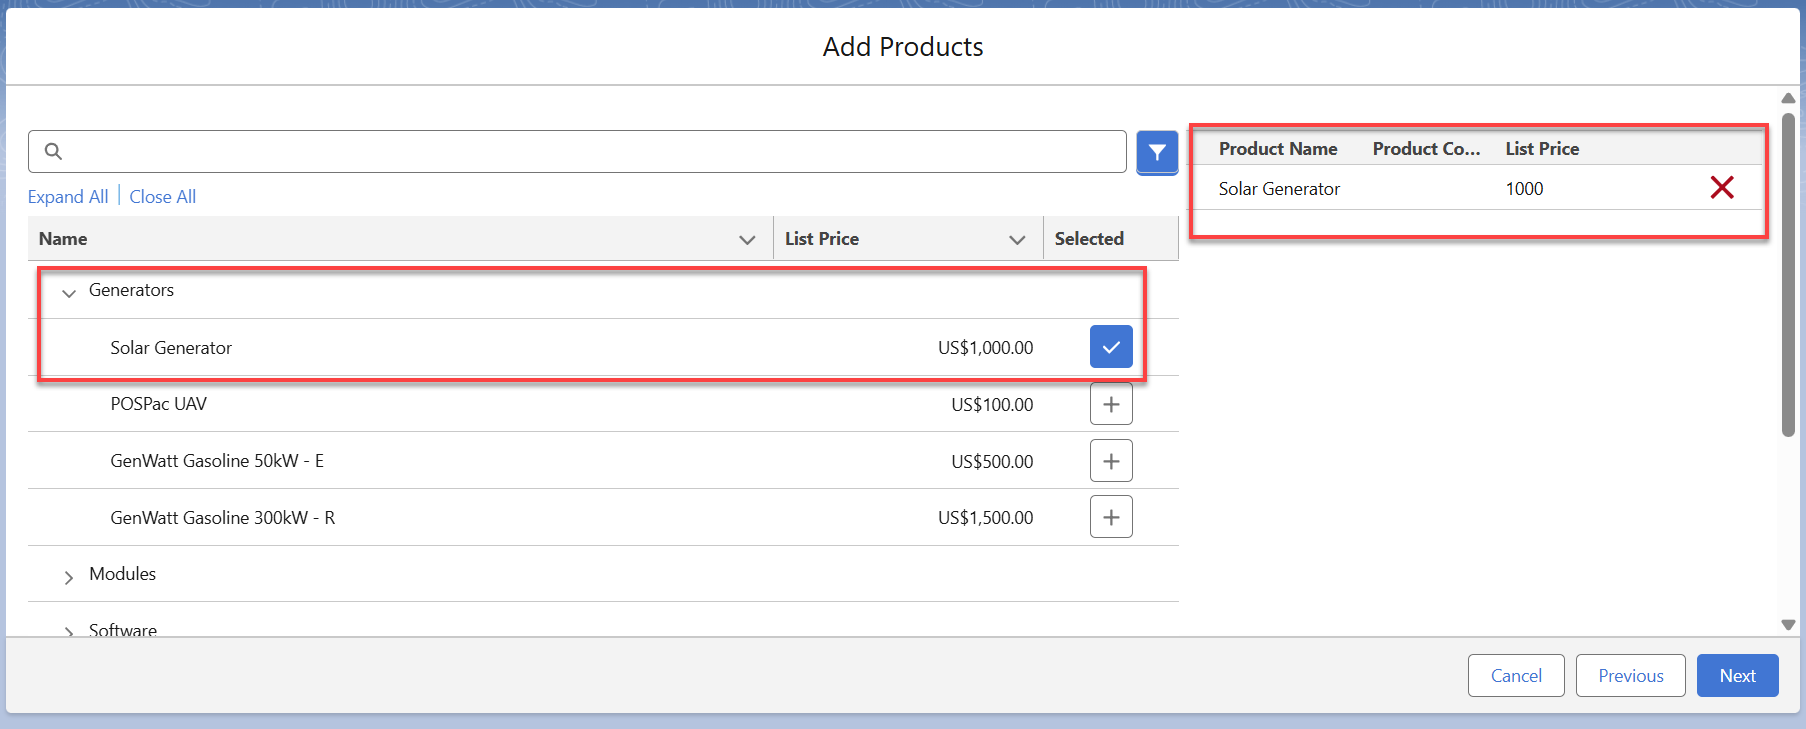
Once you have done this, you can select your products.
Let's open the Generators product category and choose a product. Once selected, the product is added to the right-hand pane.
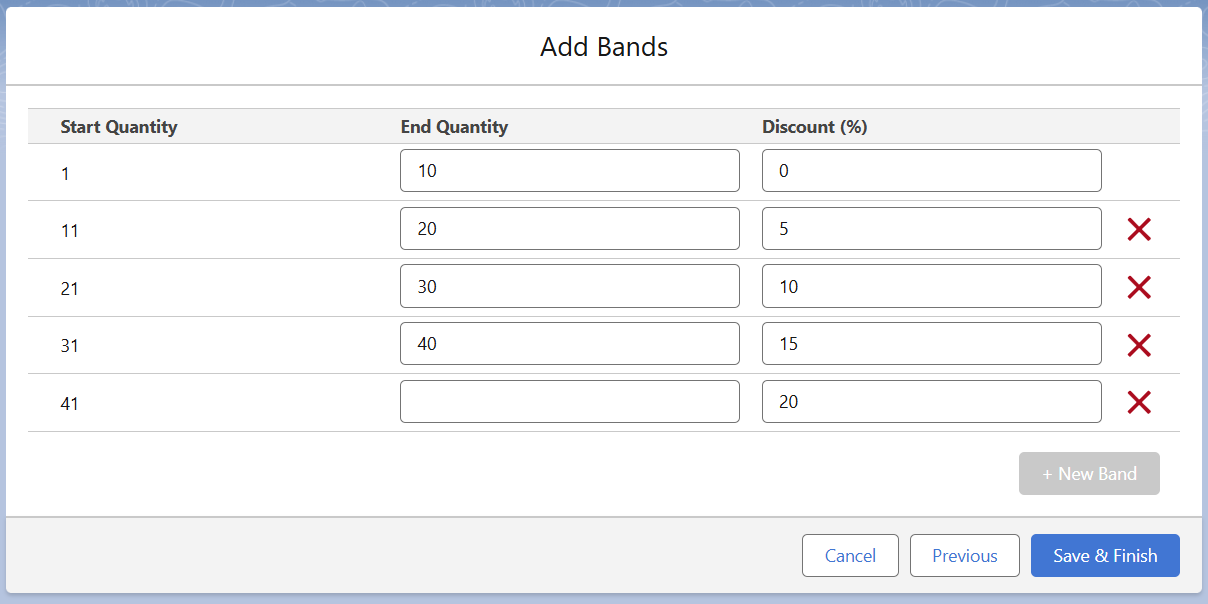
Clicking Next allows you to input your bands, specifying the Start and End Quantity and the discount from the List Price. For this example, I have created 5 volume pricing bands for the product.
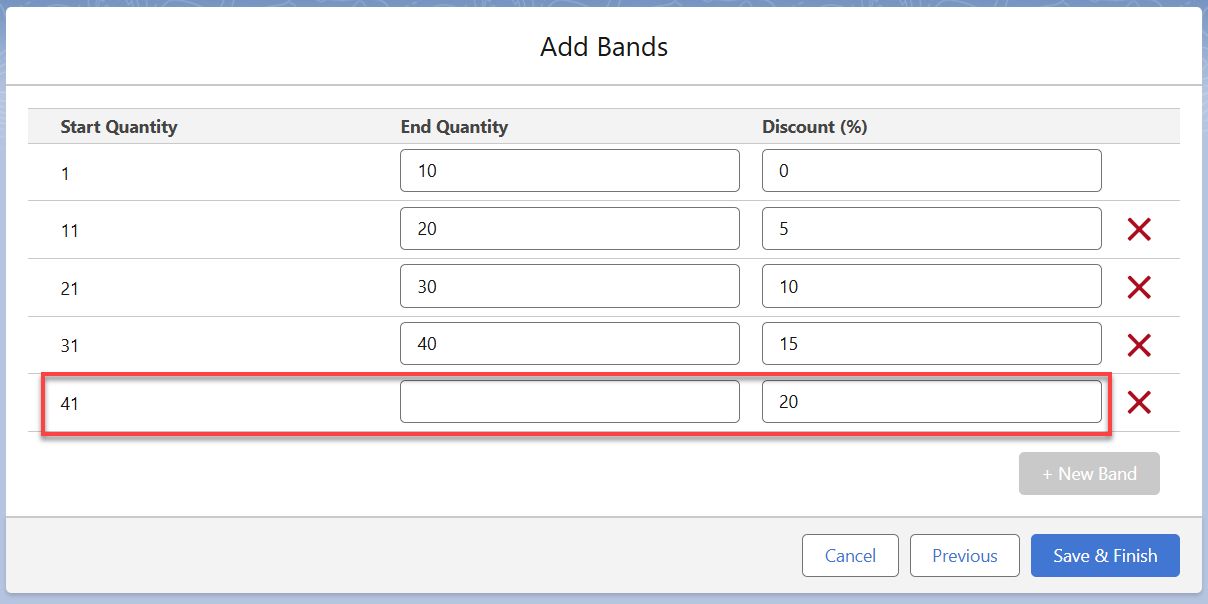
As you can see below, I left the End Quantity blank for the final band. In other words, the customer receives a 20% discount on this product for a quantity of 41 or more.
And that's it! Here's a video to showcase this for both band-based pricing in Salesforce and tier-based pricing in Salesforce:
Does GSP Volume Pricing Integrate with GSP Product Manager?
Yes! Many companies use GSP Product Manager to create product bundles and groups in Salesforce. And GSP Volume Pricing is purpose built to integrate seamlessly with it. Together, the 2 apps provide your salespeople with a powerful, straightforward, and intuitive way to manage volume pricing in Salesforce.
What's the Best Way to Track Volume Pricing Discounts in Salesforce?
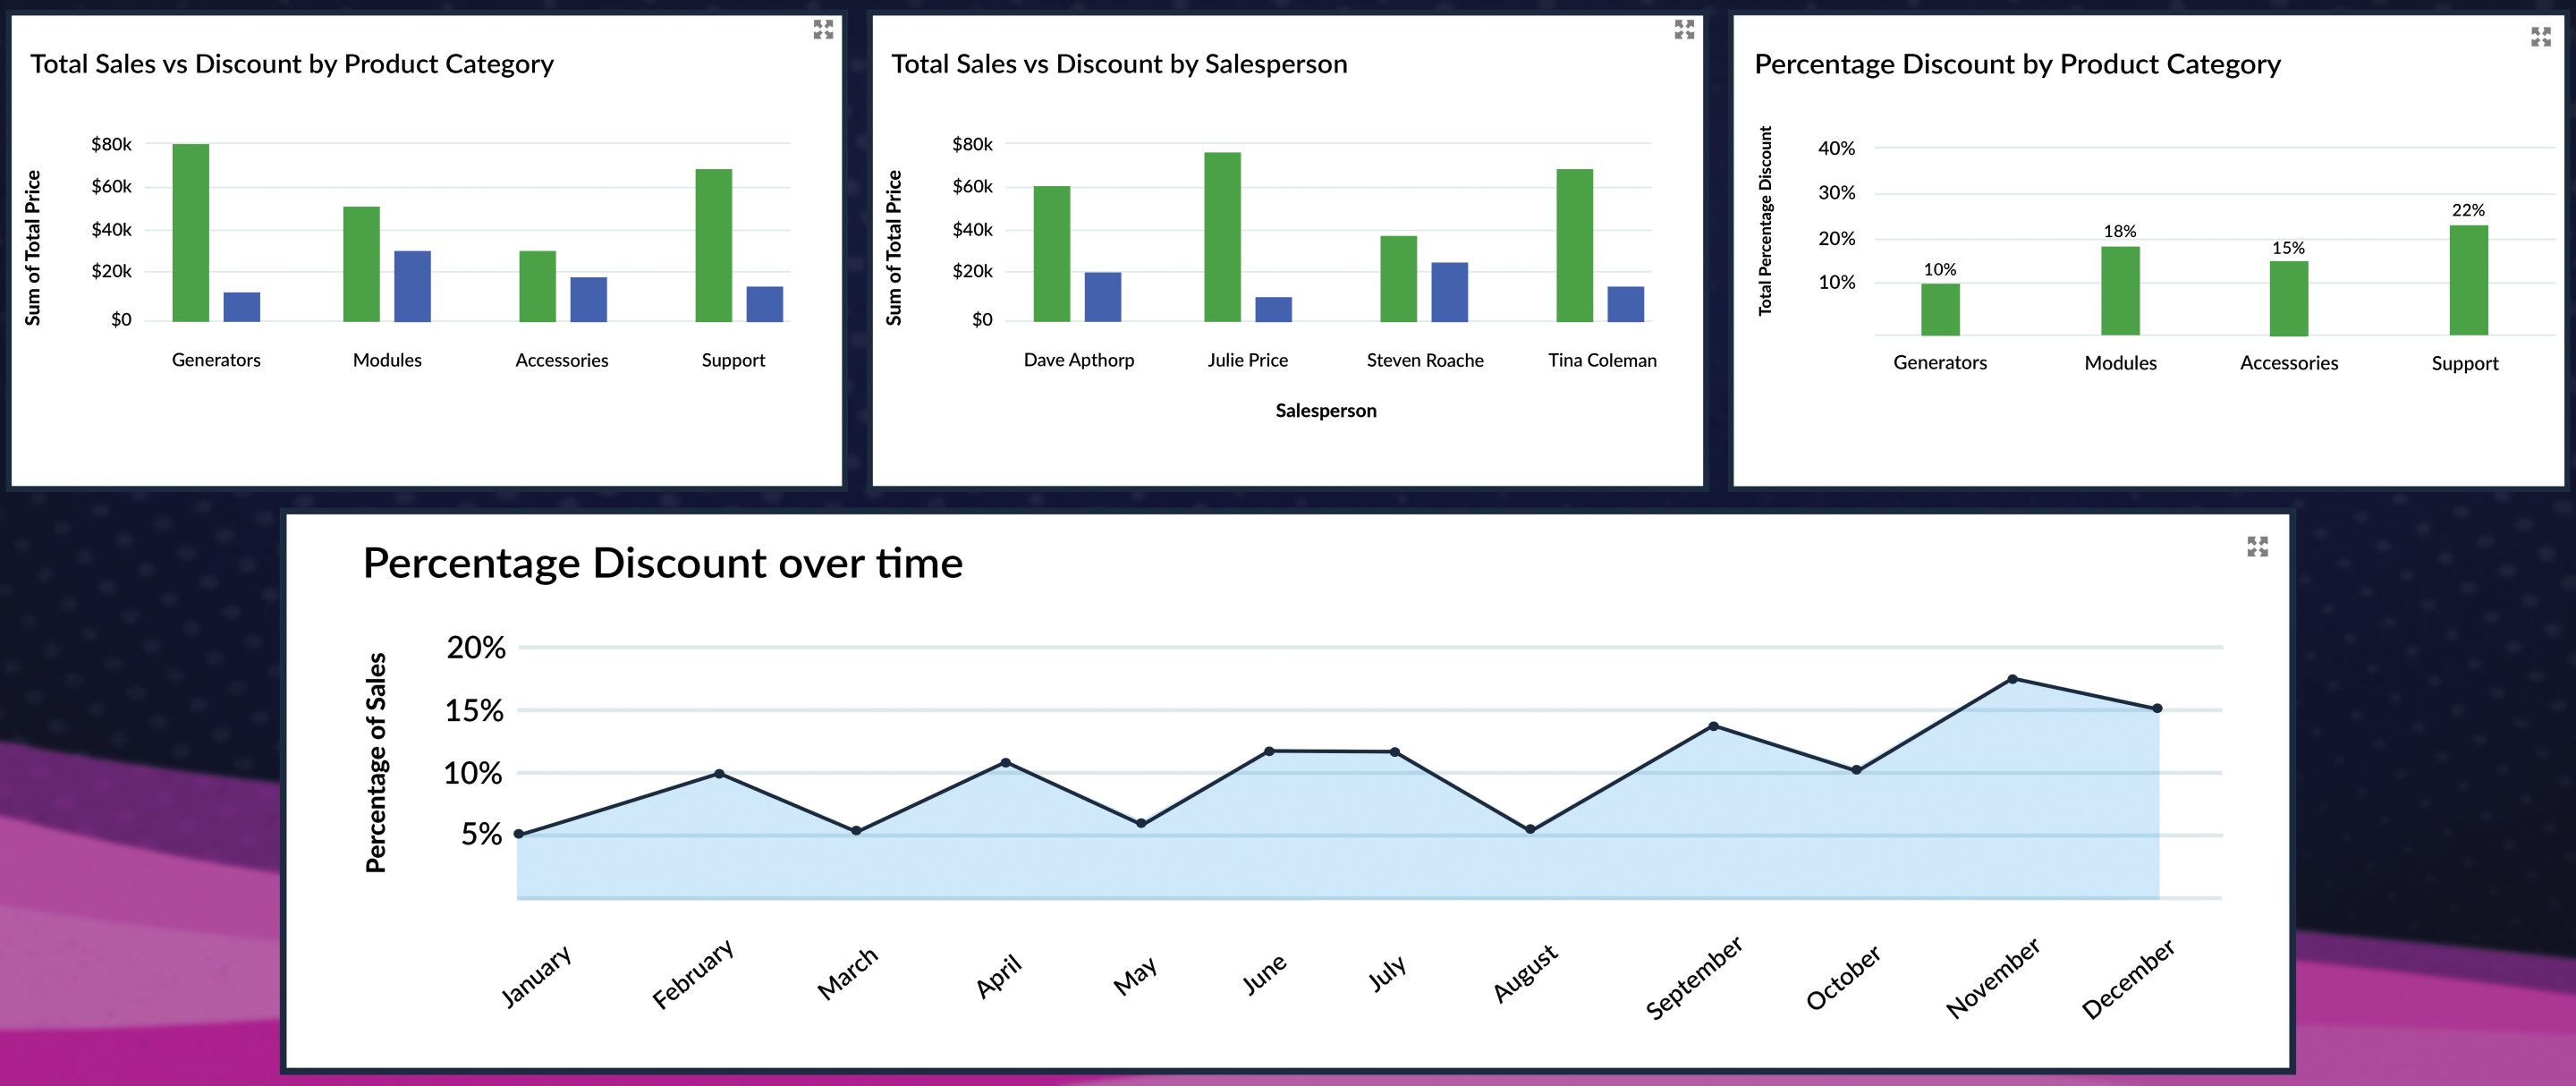
The best way to track volume pricing discounts in Salesforce is through the critical reports and dashboard charts included in GSP Volume Pricing, as they provide complete visibility of customer discounts. As these images show, you can view opportunity product discounts by salesperson and product category.
Of course, you can adjust and customize reports and charts to tailor the information to your specific regions and product groups.
Ready to Start Using Volume Pricing in Salesforce?
Why not install GSP Volume Pricing from the AppExchange into your sandbox or production environment to see how it works for yourself?
Alternatively, get in touch and we’ll be happy to answer your questions or get you set up with a proof-of-concept.
In The Spotlight…Omada
From spreadsheets to a simple, flexible, Salesforce-native app, discover how GSP Volume Pricing transformed the way Omada uses Salesforce.
Volume Pricing in Salesforce: FAQ's
Volume pricing in Salesforce (also known as quantity-based pricing) means the customer receives a lower unit price per item when they purchase a higher quantity. For example, a single item might cost $50, but in a volume pricing strategy, where the customer buys more than 10, the cost per item might drop to $45, or $40 if they buy more than 20.
Volume pricing in Salesforce encourages customers to increase their overall spending because they receive a discount for buying more. Salespeople sometimes provide the customer with more than one quote based on different purchase quantities to communicate the benefits (savings) of the volume pricing strategy.
What To Do Next
Ready to take the next step? Here are three ways you can explore the GSP Volume Pricing app further:
1. Try the Volume Pricing app for yourself: Install it from the AppExchange Listing into your sandbox or production environment to see how it works.
2. Are you using product bundles or groups? The GSP Product Manager is designed to make managing groups of products much easier in Salesforce. Learn more about the Product Manager here.
3. Find out how the Volume Pricing app transformed the way Omada uses Salesforce: Read Omada's story of how they went from relying on spreadsheets to a simple, flexible, Salesforce-native solution for managing their volume pricing.
4. Get in touch! We’ll walk you through the app, answer your questions, or help you get started with a proof of concept. Complete the form below to get started.