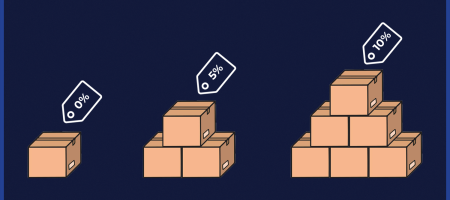
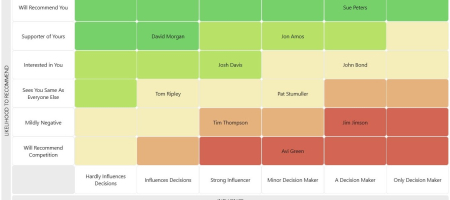
10 Tips to Prepare Salesforce Import Data
Where on earth do I start?”
That’s a common reaction when contemplating how to import data to Salesforce or improve existing data quality.
And it’s true. There’s a lot to do. Much hard work can be necessary when it comes to importing data. Combined with a certain level of attention to detail.
But relax. Whether you’re importing data for the first time or improving your existing salesforce data, use our tips and best practice guide to make the process a lot easier and achieve a better data quality outcome.
After all, high quality data is a proven driver of salesforce user adoption and accurate report and dashboards. And that means all salesforce users have better insight into sales performance and the sales pipeline..
1. Spreadsheet for importing data
You can’t just import data from any old spreadsheet into Salesforce. The spreadsheet itself has to be properly formatted and structured.
Collate your data from the various sources. Existing CRM systems, accounting packages, users’ own spreadsheets, business cards stored in desk drawers are all common sources of existing data. Pull it all together and start populating your spreadsheet.
If you’re improving existing salesforce data here’s what you need to do. Create a tabular report containing the Account and Contact data you want to improve. Don’t forget to include the Account ID and Contact ID – you’re going to need these when you import your changes. Export your report to CSV format and then follow the tips below to improve your data. When you’re finished, use the Data Import Wizard to update your existing data.
2. Account Name
Sort the spreadsheet by Account Name. Scroll down the list, correcting any obvious spelling mistakes. Check for inconsistencies. If you have three Contacts you’re going to have three rows in your spreadsheet. So make the Account Names consistent within each row.
3. Street Address
Many organisations will have several components to their Street Address (we’re talking about all parts of the address before the City).
It’s essential that the Street Address for each Account is contained in a single cell. Likewise for the Street Address for Contacts. In our case, for example, “3rd Floor, 9 Devonshire Square” goes into one cell, with the two components separated by a comma.
Whilst you’re at it, strip out all the zip codes, city data, phone numbers or anything else lurking in the Street column. Cut and paste that data into the relevant column in the spreadsheet.
4. City, State and Country
Sort the spreadsheet by each column in turn. Scroll down the spreadsheet, making sure the data is consistent within each column. The City column should contain only town and city data for example. State, zip codes (and any other data for that matter) belong in their respective columns.
While you’re at it, correct any obvious spelling mistakes. And make abbreviations and values consistent. CA or California across all data values, for example. UK or United Kingdom. Not a mix of both.
5. Phone numbers
First things first – don’t lose your leading zeros. In your spreadsheet, format all columns containing numbers (US readers, that includes the zip code column) to TEXT. You don’t want 0203 280 3665 beginning with 203 in Salesforce.
Then look for cells with more than one number. The company Switchboard number belongs in the Account Phone column and a direct dial number in the Contact Phone.
Look for any obvious inconsistencies. All UK mobile phone numbers, for example, begin with 07. Cut them out of the Account Phone column and paste them into the Mobile column for the Contact.
Superb Pipeline Visibility and Sales
Performance Metrics from this free Dashboard.
6. Email Addresses
The scourge of data import!
More problems arise from incorrectly formatted email addresses than everything else put together.
Here are the most common errors:
– Punctuation marks at the beginning or end of the email address.
– Missing @.
– No period mark.
– A character space within the email address.
Here’s how to test for these problems.
- From the Data menu within your spreadsheet, select Filter. This will add the Filter dropdown function to each column.
- Click the filter down arrow in the column containing the email addresses.
- Hover over the Text Filters menu option.
- Select ‘Begins With’.
- In the top dialogue box, type the comma mark and then click OK.
This will return all the emails that start with a comma. Go ahead and fix the problem.
Then do the same for the various other potential issues using the same process. Check for character spaces within the email addresses by placing your cursor in the ‘Select’ dialogue box and then pressing the space bar once.
7. Contact Names
Here again you have a choice in how you format your spreadsheet. Place the First Name and Last Name in the same column. Or split them into separate columns. Unfortunately you can’t mix and match.
Remember that whichever approach you choose, each Contact needs to be on a separate row. So if you have five Contacts at the same Account, you’ll have five rows.
Make sure the Account Name and Address are the same in each row. That way, when you import the data, Salesforce will de-duplicate the Accounts so that you’re left with one Account and five attached Contacts.
Check for any obvious errors by sorting the spreadsheet by Name (or First Name and then Last Name if you’re using two columns for Contact name). Make sure names are properly capitalised, that way when you send a mass email you’ll be addressing Gary and not gary. If you’re confident in fixing any spelling mistakes then go ahead and do so, remembering names can be legitimately spelled in different ways (Gary and Garry, for example).
8. Type and Industry Fields
Now is also a good time to set the correct values for the Type and Industry fields. The chances are that if you don’t do it now, then it’s probably not going to happen in the future.
You may need to change the standard salesforce picklist values for these fields. The typical values you’re going to need for Type include Customer, Prospect, Supplier and so on.
There is also a wide ranging set of standard values in the Industry field. Customise these to the specific needs of your business. If you operate in a particular market niche then you may want to change the values to be appropriate to that niche. Be careful not to overlap with the Type field. The two sets of picklist values should be mutually exclusive.
Then sort the spreadsheet by Account Name. Populate (or get someone who knows the data to populate) the Type and Industry values for each record. Laborious, but if it doesn’t happen now then the chances are it’s not going to happen any time soon after you’ve imported the data to Salesforce.
9. Record Owner
This refers to the User that will own the Account & Contact records when you import them to Salesforce. Every record needs to have an Owner, albeit the Account Owner and Contact Owner don’t necessarily need to be the same person.
If you don’t specify the Owner then the person that performs the data import will be set as the Owner. Which may be fine. You can always re-assign the records later using the Mass Transfer function in Salesforce. However, if you’re getting ready for go-live, then ensuring the data is assigned to the correct Owners will often avoid lots of unproductive argument and discussion during the training!
10. Field Length
Nothing is more frustrating than spending lots of time preparing your data then doing the import, only to find some data didn’t load because the field length was too long.
Every field in Salesforce has a maximum length. This is invariably large enough for any well formatted set of data. The problems that occur typically arise due to problems that weren’t picked up in preparing the data, for example, two email addresses in the same spreadsheet cell.
To check for this use the LEN function in a blank column in your spreadsheet. The maximum character length of some of the most important fields is:
– Account Name: 255
– Street: 255
– Phone: 40
– Email: 80
– Last Name: 80
Remember spaces count as characters when you test your data.
Now it’s time to import your data! If you’ve just finished doing the data preparation then have a coffee break before you move onto the import process. You don’t want to mess it up now after all that hard work!
And finally, if you have any difficulty get in touch and we’ll give you some guidance by email or over the phone.
Additional data import resources:
- Salesforce Help on using the Account & Contact Import wizard.
- Read our blog post, 10 Tips To Merge Salesforce Environments.
Our 27 page eBook shows you the 12 killer
Sales Charts for your dashboard.

Don’t have time to read the entire Blog Post right now?
No problem.
You can download the entire “Your Sales Forecast Is Probably Wrong” eBook for free by completing the form below!