When Repeat Opportunities Are Right (And When They Are Not)
Learn how to handle repeat opportunities in Salesforce the right way.
Last updated June 3, 2026


Download the 12 Must-Have Charts for Your Salesforce Dashboard eBook today!
Managing repeat opportunities in Salesforce is often misunderstood. Many companies create recurring opportunities when they shouldn’t or fail to create them when they should.
The consequences?
- Your sales process and opportunity stages become unnecessarily complex.
- Accurate funnel visibility becomes difficult.
- Pipeline quality metrics on the size and quality of the funnel become distorted.
- Opportunity conversion rates or win rates become devoid of meaning.
- Revenue recognition and reports forecasting revenue over time are unreliable or hard to produce.
In this article, we’ll explain the one simple question you can use to instantly determine whether repeat opportunities are the right approach, and walk through 5 practical examples to help you get this right.
Get Repeat Opportunities Right in Salesforce
Why Do Companies Get Repeat Opportunites in Salesforce Wrong?
Many companies struggle with repeat opportunities in Salesforce due to deeper structural issues.
A common problem is misalignment between sales and finance. When these teams don’t agree on how revenue should be forecasted and recognized, it creates conflicting definitions of what counts as new sales versus repeat purchases.
Another issue arises when organizations try to force Salesforce to behave like an ERP system. These places put unnecessary strain on the opportunity object, pushing it to handle scenarios it was never designed to support. The result is often an over-reliance on opportunities for reporting, where data is manipulated to fit dashboards, rather than designing processes that reflect reality.
Underlying all of this is a more fundamental challenge: a lack of clarity around what an opportunity actually represents. When different teams interpret opportunities differently, data quickly becomes inconsistent and unreliable.
So, how do you determine when repeat opportunities are the right approach in Salesforce?
The ONE Question to Ask Yourself About Recurring Opportunities
The simplest way to determine whether you should use recurring opportunities in Salesforce is to ask one critical question: “Is my future revenue at risk?”
Many companies default to creating recurring opportunities when revenue is received over time. For example, with multi-year contracts billed annually, or a paid proof-of-concept that may lead to a longer-term agreement.
- But are you guaranteed to receive the revenue in future years?
- Or is there account management/sales work required to secure the future revenue?
If your future revenue is at risk, then recurring opportunities are usually the right approach.
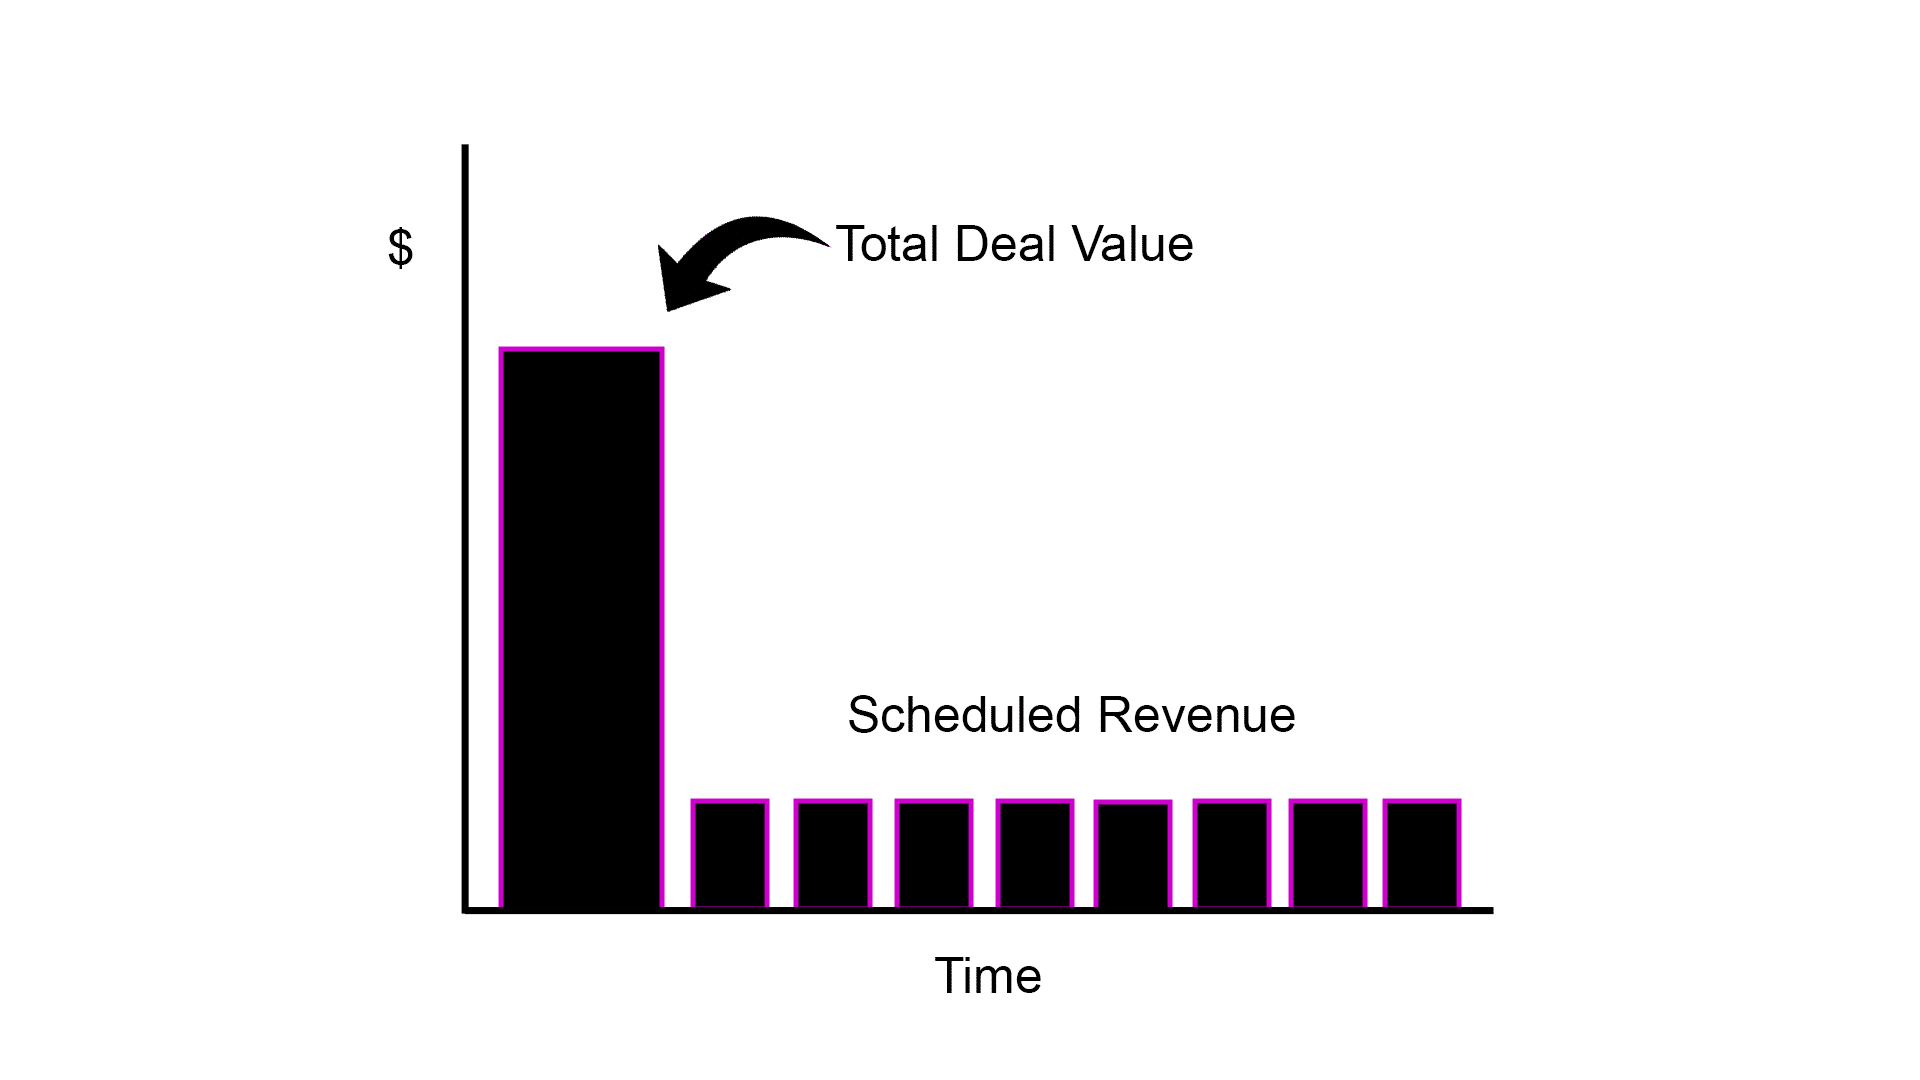
If it’s not a risk, the better option is to use product schedules to model revenue over time—without adding unnecessary complexity to your pipeline.
5 Examples of How to Track Repeat Business in Salesforce
When deciding how to track repeat business in Salesforce, the key is to first identify the type of opportunity you’re dealing with.
Here are five common scenarios and the right approach for each:
- Multi-year contracts: when recurring sales are contractually committed, create one opportunity with multiple product schedules.
- Proof-of-concept (PoC): here, future revenue is not guaranteed, so it’s best to create one opportunity for the PoC, and separate opportunities for future work.
- Free trial: with no commercial commitment yet, use a single opportunity with stage progression.
- Framework agreements: when future orders are independent, create separate opportunities for each project.
- Recurring orders: when orders are operational, rather than sales-driven, don’t use repeat opportunities.
Each scenario hinges on one principle: whether future revenue is committed or at risk.
Let’s look at each example in more detail.
Got a Salesforce Challenge? Let's Tackle It Together.
Book a free 45-minute consultation with one of our Salesforce experts. You set the agenda — we'll give you honest, practical advice you can act on straight away.
Free Salesforce Review · 45-Minute Video Call · You Choose the Topic
1. How to Manage Multi-Year Contracts in Salesforce
Trimble Applanix uses multi-year contracts in Salesforce. Historically, the company sold software on a perpetual license basis, but this has evolved into a SaaS subscription model, alongside warranty and support contracts for hardware and software products, lasting one, two, or three years.
As a result, in addition to booked revenue, ARR and MRR metrics in Salesforce have become critical.
So how should multi-year contracts be handled in Salesforce?
“Is future revenue at risk?”
No.
Take a typical 3-year contract. While Applanix may only invoice for the first year upfront, the customer has signed a binding three-year agreement, so the future revenue is considered secure.
As a result, Applanix creates a single opportunity in Salesforce to manage the initial sale of the software and warranty. Instead of creating separate opportunities for each year, Applanix schedules revenue over time because it:
- Provides complete visibility of ARR/MRR metrics in Salesforce.
- Enables accurate revenue forecasting over the term of the 3-year contract.
- Avoids spurious opportunities distorting pipeline visibility and win rate metrics.
2. How to Mange Proof-of-Concepts in Salesforce
Yapily uses chargeable proof-of-concepts because its products are relatively complex, requiring effort from both Yapily and the customer to implement them.
So, how do they manage paid-for proof-of-concepts in Salesforce?
“Is future revenue at risk?”
Yes.
Even though Yapily’s customers tend to commit after a proof of concept, it’s not guaranteed, so future revenue remains at risk. Therefore, the company creates 2 opportunities:
- The first opportunity relates to the proof-of-concept.
- The second opportunity refers to the primary purchase.

The two opportunities' sales processes and closing strategies are different, and their values vary significantly. Yapily manages this using product schedules because:
- It spreads revenue from both opportunities over time.
- Allows both deals to be tracked in the pipeline.
- Allocates revenue recognition in Salesforce to the appropriate months.
3. How to Manage Free Trials in Salesforce
Book4Time offers customers a free trial so they can try the software for a month before deciding whether to purchase it.
“Is future revenue at risk?”
Yes.
Like a proof-of-concept, there’s no guarantee that a free trial will convert into future revenue. To manage free trials in Salesforce, Book4Time creates a single opportunity to represent the deal, setting the Close Date to the end of the trial.

When Book4Time does convert a free trial into recurring sales, and therefore needs to manage its subscription-based products, GSP Subscription Manager enables them to:
- Track monthly recurring revenue (MRR) and churn rates.
- Automatically create renewal opportunities as the contract reaches the end of its term.
4. How to Manage Framework agreements in Salesforce
Gilbarco Veeder Root (GVR) manages framework agreements in Salesforce – specifically draw down agreements. As a customer is unlikely to want delivery of all its pumps at once, it 'draws down' against the volume agreed, usually in line with a gas station refit or expansion program. And these orders can be placed by various regions and divisions within the gas retailer and spread over several years.
So, how does GVR manage framework agreements in Salesforce?
“Is future revenue at risk?”
Yes.
While the framework agreement covers the main terms, conditions, and pricing, it doesn’t necessarily guarantee future work – GVR doesn’t know whether it will receive 1 order or 100.
Therefore, GVR initially creates one opportunity with a notional value to represent the framework agreement, allowing the company to manage the sales process and track the framework agreement pipeline.
Every time a new order is placed, GVR must create a new opportunity, as each has its own sales process with activities related to technical specifications, delivery, stakeholder management, and fulfillment.

5. How to Manage Recurring Orders in Salesforce
Ammex provides latex gloves and other personal protection items to the medical industry. Like GVR, it too has framework agreements in place with its customers. But unlike GVR, its orders are transactional and much smaller.
“Is future revenue at risk?”
Yes.
Like GVR, there’s no guarantee of if/when a customer will place an order. However, unlike GVR, where orders are comparatively large and have their own technical specifications, recurring opportunities don’t make sense for Ammex because customers place relatively small orders on a regular basis. In Ammex’s case, creating an opportunity for each new order would create a huge administrative burden.
To manage recurring orders in Salesforce, Ammex creates a single opportunity to support the sales process for the framework agreement, storing the pricing arrangements in its ERP system. Customers then place orders via the ERP system's portal, which are pushed through into Salesforce weekly and linked to the key account plan.

Additionally, the sales team uses GSP Account Planning to create and track executable business expansion plans, which delivers high-quality visibility into each customer's business volumes, purchasing trends, and performance versus target.
Start Using Repeat Opportunities in Salesforce
Ask yourself one simple question: “Is my future revenue at risk?”
If the answer is yes, you should likely create separate opportunities for each order to ensure accurate tracking and forecasting.
If the answer is no, you should focus on accurately managing revenue over time and ensuring proper visibility of revenue recognition in Salesforce.
GSP Product Schedules is a great way of giving your salespeople a quick and easy way to achieve this, so you can gain critical information on metrics like revenue recognition and scheduled income versus target.
Find out more, and take a 14-day free trial from the AppExchange.
Repeat Opportunites in Salesforce: FAQs
Salesforce gives you two choices: ‘Clone’ or ‘Clone With Related’. The difference is the latter adds the products from the originating opportunity to the newly cloned record. To determine whether you should clone repeat opportunities in Salesforce, consider:
- Are you confident the customer is buying the same set of products or services?
- Has the salesperson considered additional items that would increase deal size?
- Is it better to use product schedules to track and forecast revenue over time?
Is Your Salesforce Working as Hard as You Are?
Book a free 45-minute review. Bring your biggest challenge — we'll give you straight-talking, actionable advice, no strings attached.
Free Salesforce Review | 45 Minute Web Meeting | You Set the Agenda
Steps You Can Take Now
Here are three actions you can take now.
- Ask whether future revenue is at risk in your business. That will help you decide whether you need repeat or recurring opportunities.
- Review the following apps.
- Revenue Schedules by GSP. Schedule opportunity revenue over time.
- Subscription manager by GSP. Everything you need to manage subscription products and track advanced MRR metrics in Salesforce.
- Account Planning by GSP. Create key account plans for critical customers in Salesforce.
- Read the blog post 4 Types of Framework Agreements You Can Manage in Salesforce.
Over to you.